Showing posts with label tutorials. Show all posts

Thursday, November 24, 2011

Photoshop Photo lesson 1: Levels

Okay so I'm going to make these beginner photoshop lessons, quick and simple
One because I'm lazy and two because I lack technical photoshop knowledge :P

LEVELS!
Levels are my most favourite 'adjustment' in photoshop. Adjustment is just the name photoshop gives to a group of well, err, adjustments to help you make your photos pretty.

I should also quickly note I have photoshop CS4 and to get to adjustments I make sure I have my 'basic workspace' in place
Windows (top toolbar) -> Workspace -> Basic


This then sets up some icons on the right hand side of my photoshop screen and the adjustment icon is the circle which is half white half black!
Photoshop screencap showing the black and white circle in the right hand column

Still with me? I just wanted to mention it cause there are a few ways to get to the adjustments window, google it, if it's a bit different in your photoshop!

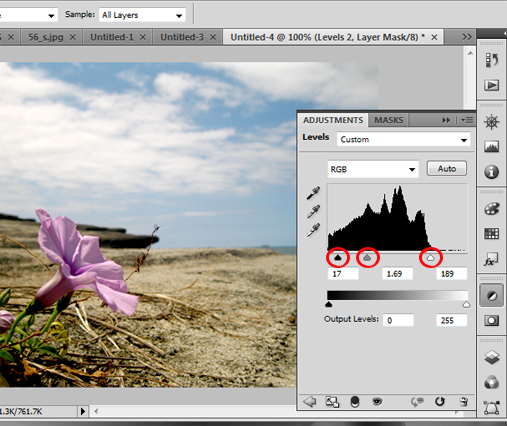
So after you have clicked on the black and white circle adjustment icon, you'll need to locate 'levels' which is the histogram icon or the mountain-esque icon for the silly like myself! Clicking on this will bring up the adjustment/mask window which you can see above :)

Now in levels there are a billion and one things you can do! Heck there is even a simple "Auto" button, that corrects everything with a click on one button, like you can see below...


But I prefer to have more control, so I just move some triangles which gets the 'freestyle' fee result :P

The screencap is after i've moved the triangles to get the best result

You can see three red circles I've drawn onto the screen cap, when you first open levels these triangles are perfectly spaced out, the black triangle to the far left (deals with the shadows of your image) the grey in the middle (deals with the mid tones) and the white(deals with the highlights). Now the actual histogram is important but I pay no attention to it and just move the triangles until my photo looks nice!

THE END....quick and simple!

The best way to learn is to understand the basics, google lots and then play around with it yourself, photoshop is amazing and I'm constantly learning!


read more "Photoshop Photo lesson 1: Levels"

Wednesday, April 27, 2011

Brass Hex Nut Bracelet DIY tips


 I've been making this Hex Nut bracelet since 2011! I think I've made about 4 sets for Ben and a few for myself and they've always gone down a treat.  I decided to make Ben and I a new set but this time use some stronger twine rather than the butcher's twine because that tends to break fairly quickly! I also wanted to add some of my own tips and what I've learnt :)


WHAT I USED
1) 3mm Hex Half Nut in silver.  Silver seems to be easier to find then the brass varierty! I really like how little the 3mm ones are, it ends up with a more dainty bracelet too!

2) 3mm venetian blind cord which I picked up at our local hardware chain, Bunnings.  You'll need to cut the cord into 3 x 40cm/16" lengths.

3) Loctite Superglue

 
TIPS

1) Make sure the twine can go through the nut hole, mine barely did, which made threading the nuts a little awkward but kept the overall finished look of the piece cleaner (and prettier in my opinion!)

2) Tape/clamp down the 3 strands of string before you start braiding. Plaiting is hard enough, but with bolts added to the mix, it helps to have your project secured down!

3) I threaded all my nuts onto the three separate strings before starting (saves trying to thread them on as you are going!).  I also folded the ends of the strings into bundles secured by tape so the nuts wouldn't fall off whilst plaiting.  

4) If you're having trouble threading the nuts onto your string, a bit of tape on the end twisted into a point will help things a lot!


5) The original instruction's measurements were slightly out (I plaited the first section for 7cm/2.7" before adding the nuts onto the bracelet!)

6) Adding the nuts is hard! Everyone else on the site seemed to find it quite easy, but not me, it took myself many attempts to work out the process. The original instructions are really awesome though, I'll just add by saying, when adding the nuts into the plait, it really is all about holding them tightly in place and keeping it all really tight before you cross the strand over! Otherwise it will look messy and nuts will be flying in every direction!


7) I finished off my piece by pulling both sides through a slightly larger hex nut (idea from this lovely site here!).  It's only a few days in but it seems to be holding up well.  I also put a dot of superglue on both ends of the chord to seal it good!


Ta Daaaaaaaa!
It's really pretty and shiny in real life, who would of thought..nuts!

I also think this is such a good DIY idea for guys.  I wouldn't say every guy would love but Ben does and I find it really hard to find good DIYS to make him!


P.S. I have just added a "Posts Emailed to You" section over on the right column *points right* psst... it's just above the facebook fan page icon! This email thing is particularly neat if you're lazy and would like some reading material delivered straight to your email...I'm excited!!
read more "Brass Hex Nut Bracelet DIY tips"