
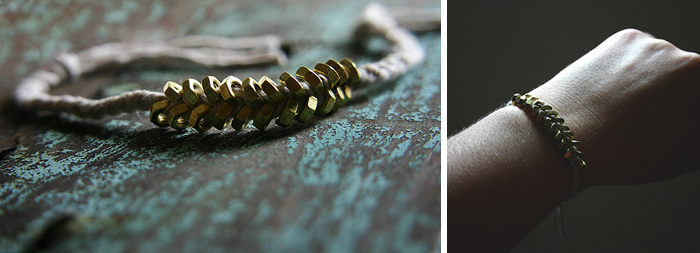
I've been making this Hex Nut bracelet since 2011! I think I've made about 4 sets for Ben and a few for myself and they've always gone down a treat. I decided to make Ben and I a new set but this time use some stronger twine rather than the butcher's twine because that tends to break fairly quickly! I also wanted to add some of my own tips and what I've learnt :)

WHAT I USED
1) 3mm Hex Half Nut in silver. Silver seems to be easier to find then the brass varierty! I really like how little the 3mm ones are, it ends up with a more dainty bracelet too!
2) 3mm venetian blind cord which I picked up at our local hardware chain, Bunnings. You'll need to cut the cord into 3 x 40cm/16" lengths.
3) Loctite Superglue
3) Loctite Superglue

TIPS
1) Make sure the twine can go through the nut hole, mine barely did, which made threading the nuts a little awkward but kept the overall finished look of the piece cleaner (and prettier in my opinion!)
2) Tape/clamp down the 3 strands of string before you start braiding. Plaiting is hard enough, but with bolts added to the mix, it helps to have your project secured down!
3)
I threaded all my nuts onto the three separate strings before starting
(saves trying to thread them on as you are going!). I also folded the
ends of the strings into bundles secured by tape so the nuts wouldn't
fall off whilst plaiting.
1) Make sure the twine can go through the nut hole, mine barely did, which made threading the nuts a little awkward but kept the overall finished look of the piece cleaner (and prettier in my opinion!)
2) Tape/clamp down the 3 strands of string before you start braiding. Plaiting is hard enough, but with bolts added to the mix, it helps to have your project secured down!
4) If you're having trouble threading the nuts onto your string, a bit of tape on the end twisted into a point will help things a lot!

6) Adding the nuts is hard! Everyone else on the site seemed to find it quite easy, but not me, it took myself many attempts to work out the process. The original instructions are really awesome though, I'll just add by saying, when adding the nuts into the plait, it really is all about holding them tightly in place and keeping it all really tight before you cross the strand over! Otherwise it will look messy and nuts will be flying in every direction!

7) I finished off my piece by pulling both sides through a slightly larger hex nut (idea from this lovely site here!). It's only a few days in but it seems to be holding up well. I also put a dot of superglue on both ends of the chord to seal it good!

Ta Daaaaaaaa!
It's really pretty and shiny in real life, who would of thought..nuts!

P.S. I have just added a "Posts Emailed to You" section over on the right column *points right* psst... it's just above the facebook fan page icon! This email thing is particularly neat if you're lazy and would like some reading material delivered straight to your email...I'm excited!!
I also think this is such a good DIY idea for guys. I wouldn't say every guy would love but Ben does and I find it really hard to find good DIYS to make him!

P.S. I have just added a "Posts Emailed to You" section over on the right column *points right* psst... it's just above the facebook fan page icon! This email thing is particularly neat if you're lazy and would like some reading material delivered straight to your email...I'm excited!!
Wow! Never would have thought of nuts as jewellery but that's really pretty! :)
ReplyDeleteI reckon!
ReplyDeleteCrazy cool what people come up with huh!
Looks fantastic! and happy birthday to you!
ReplyDeleteps. I've tagged you in my latest post, check it out xoxo
thanks Carolina!
ReplyDeleteWill go investigate this tag :)
Neat!! :) I think the nuts I bought were too big... Haha, they were the smallest ones I could find though. And you're right about it being difficult to find brass ones. Mine are silver.
ReplyDeleteYeah I had to go for the super little ones, maybe find a thicker rope, or whatever you are going to use for the braiding part! I ended up making my boyfriend a bracelet too and foundnd a set of hex nuts for $2 bucks (only silver) at a cheap store! Luckily the set included super tiny hex nuts!
ReplyDelete