Showing posts sorted by relevance for query stool. Sort by date Show all posts

Friday, February 19, 2016

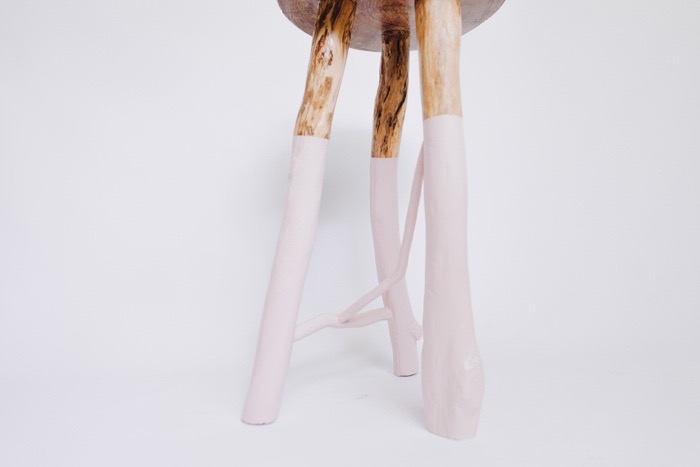
Pastel DIY wooden stool

Okay I think this may be my best stool yet - hurrah! I was a little scared to sit on it but Ben tested it out, full weight and all, giving it a two thumbs up. I think it might be similar to sewing something when you're not super confident in your stitches and you become fearful the whole thing will fall apart when you wear it :p Despite personally avoiding sitting on this stool (just yet) it has been diligently supporting my bathroom supplies for at least a week now with no issue :)


I ended up coating it with a satin vanish, I didn't really want to because I love the raw wood look but knowing it was going to live in a wet location, aka the bathroom and seeing how the paint on the legs chipped in its previous carnation, I decided that varnish was a sensible choice. If someone can recommend a sealer that doesn't leave a sealed look let me know! I also went to town with the sanding and the filling, it was a labour of love which took around three weeks on and off. Colour choice was hard but whilst looking through our paint collection a can of pastel pink stood out to me :)  I also left the upper legs the same colour from before but touched them up before applying the sealer.


I dug up these old photos above to show the stool's crazy progression! It actually started out as the $5 bucket stool challenge. I think I really mixed the cement wrong (too dry I'm guessing) because it literally started to crumble (not cool!). So I did a dramatic smashing of the stool and saved the legs. I then, had this awesome idea of how I would attach a wood top instead.


Don't copy this idea :p I probably should have googled it or listened to Ben "are you sure that's going to work?" because it didn't work, well it did for 6 months or so but was definitely not sturdy and started to degrade! The new stool is awesome though, because like my previous stool I actually drilled into the wood and this time at a slight angle.


Maybe next time I might make the angle a little on the lesser side but hey, it's all a learning process and it's been super fun.  It was also warming to get to take a picture of my three completed stools together side by side complete with a photobomb from Peaches.


I've got a few nice branches to make another stool but no top yet - there's been talk of Ben buying me a chainsaw as a gift :) :)


Here's a link to helpful guide to get you started on your own stool making!

Tuesday, September 30, 2014

$5 Bucket Stool Tips

So a while back I stumbled upon this $5 bucket stool DIY and thought I'd give it a go. We had some branches lying around our property that were being used for firewood so I decided to save some and give them a new life. I went down to our local hardware store here in Australia (Bunnings) and stumbled upon some concrete pavers which I thought would be even easier then having to mix my own concrete.


I sanded my branches, painted them and then nailed them to a circular thin piece of wood, which I then adhered under the concrete paver using all fix :) I put some heavy books on top of the stool and let the whole thing cure for two weeks. I have since stood on the stool but to be honest I always feel a little unsafe doing so (is it just me or do others find it hard to trust things they made themselves?) :p

I was on a bit of a stool high so decided to do the $5 bucket challenge and went down and bought myself a $10 bag of cement and a plastic tub. By the way $5 is a bit of a stretch for the project - perhaps if you bought your cement/paint in bulk and made lots of stools you could land somewhere close to that cost. 

Anyway, onto my experiences, firstly mixing concerted was harder than I thought, I had no idea about consistency and even though I tried to follow the instructions on the bag + what I could find on the internet I think my mix was a little too dry - weeks later the bottom was still crumbly. Next, I only used half the cement when in hindsight I should of mixed it all up because it was not deep enough. When I put the branch legs into the wet cement I was worried they would show at the top of the stool so thus I didn't push them in too far. In the end knowing they weren't embedded very well into the cement and in a super hodgepodge way I built a cement mound underneath to support the legs. (Not super attractive!).

Also they say to mix the cement in the bucket with one of your stools legs. I didn't want to get cement over my stool leg so I used a garden spade. I didn't realise at the time but this scratched the bottom of my plastic tub and thus the final stool has scrap mark indents on top (just something to be aware of).  Also getting the legs level was a nightmare!!!

The $5 bucket peeps realised an update to their tutorial, they mention wrapping wire around the legs to secure them, which I did, they also have a recommendation of putting adhesive into the leg holes if your legs get wobbly and come out. All three of my legs, a month later, are wobbly but since I wrapped them with wire before setting into the concrete I can't pull them out individually and glue them in - so another thing to keep in mind. 

Overall, I'm not sure which one was more of a success. I think if I had of mixed the concrete better plus used more mix in a narrower bucket and not wire wrapped the legs, the second stool would be more pick. As it stands (pun intended) I think my original one looks a little better (or neater) aesthetically but then I don't know if the top paver looks ugly or not :p  They were fun to do, I learnt a lot (mostly that I can't mix concrete) and perhaps in the future or if I'm near someone else mixing concrete who wants to spare me some I'll try for a third time lucky!


Friday, December 16, 2016

DIY wooden stool with Lettering

So I've sat with this particular stool for a while, before going kind of crazy with its paint job and calling it a day :) 


I tried to be diligent with taking photos of the process and it's nice to look back now and see the wood that I started with. I will point out this particular stool had legs from a previous cement stool (no longer with us!). I decided I'm only making stools of the sturdy variety so the concrete configurations had to go :p

The chunk of wood I found I was able to be cut in half for two stools!

The outer bark has to go! This part is really fun especially getting to use the chisels - also you can see here just how deep the piece of wood is :)

I ended up filling, the crack on top with sawdust (that I save whilst sawing) mixed with wood glue. I also make sure to spend a lot of time sanding back the wood so it's nice and smooth for the finished piece.

The sawing took me about a week and almost killed my love for wood working :p

The slice of wood was also very weathered so it needed both ends sawed off which added an extra week or so and yes, made me really really hate sawing :p I think it was worth it though, look how pretty the wood is underneath.

The guy on the right - so pretty!

Then it was time to mark the leg position and drill them out. Looking back at the finished piece, I think for the next stool I'll make the legs closer to the edges for aesthetic purposes :)

Note to self: always learning!

For the paint job: the legs are a black stain, the pink I picked up at a flea market and then some random hand lettering type design for the top with a clear sealer all over :)

Ta-daaa!

Ben started using the stool almost immediately as it's the perfect height for his craft bench outside, so I'm pretty chuffed about that

Friday, January 15, 2016

DIY Wooden Stool

Since my $5 bucket stool challenge and failed cat bed, I've had the desire to get my carpentry back on. I call myself the dodgey woodworker because I rarely check to see what I'm doing is the correct method and thus end up, with some less than questionable products. The fun aspect for me is the problem solving and the making and in the process I become absent minded of perfection. I did finally Google how to make a stool and I even went down to our local hardware store and bought myself a drill bit. I have no idea if it's the right one or not but I must say, this latest stool is my most sound yet :p


 I also went with this harlequin circus theme with the paint job, I kept second guessing my self on the colour choices and design but it's really grown on me :)

You can see how it looked before, I used a circular piece of wood I found at our old place and then some fallen tree branches from one of our walks :) I did try and be professional and measure and tape up the diamond design but since the wood surface was very uneven the paint job was very uneven I ended up finishing it off free hand. Oh and I sanded everything and filled holes before I started just to try and be a tad more professional!

I love the top, I used a stain + varnish (Black Japan gloss by Feast Watson) which I put three coats on and it's super shiny and lovely :) The rest of the stool was painted in house paint which I've collected sample pots of whilst thrifting or in the clearance bin at the paint store :) Even though I did it on the super cheap I'm sure you could go to the store and buy something cheaper and much sturdier but I love that I made it myself. I'm currently working on upgrading one of my old cement stools and this time I think I may have finally perfected my wood stool method and you might even be able to sit on it :P

Thursday, March 23, 2017

Wooden Stools Update

I thought I'd give a little stool update and talk about a new technique which has meant it's now much quicker to make a stool - hurrah!

I'm super in love with my latest stool, maybe because it's dip-dyed pink but also awesome the combo of it being wonky AND structurally sound!

Making a stool usually takes me about a week and a big component of that was drilling the leg holes into the hardwood top, well until I finally set up our drill press!

Ben got given a bunch of tools from his bro, this drill press above being one of them. At the time, I had no idea what a drill press was but they consistently came up whilst googling wood working techniques. My only hurdle - the bolts were all rusted stuck! A few hours later of me being super stubborn and not letting rust win I managed to get everything unstuck, patted myself on the back and set the drill into place. I'm not 100% sure I have it rigged up correctly but even with the current set up it was at least five times faster then hand holding the drill :)

Even though it kind of looks like a face, the main reason I took the above photo was to show the difference in the drilled out holes. The hole on the left was with the drill press and the hole on the right was me hand holding the drill. With hardwood, you can't continually drill, because you'll burn out your drill bit which meant every time I re-started drilling (with the hand hold method) I inadvertently changed angles slightly which meant the finished hole was super messy! The drill press on the other hand, makes sure the angle is always the same.

I've got a bunch of timber I've collected to make a bunch more stuff, which I'm all super excited about! On a side note, our house now has a lot of stools, an item I never knew we needed before I started making them :p

Monday, September 5, 2016

Wooden Bathroom Stool


I've been all about wood working as of late and decided to do something with a rectangle piece of weathered wood that I'd found. I also decided that we needed a bit more storage in our bathroom so the bathroom stool was born :)

I cut two pieces of timber to add reinforcement where the stool legs sat in - not sure if I needed to do this or if it was more of an aesthetic choice to the final design?!

You can see above how I nailed the planks to the weathered board below and drew some rough pencil circles where I wanted the legs to sit. Then it was just a matter of drilling out the holes with my 38mm spade bit on my drill.

The legs were just a fallen tree branch that I cut down into equal sizes and gave a rough sanding to. When I drill the holes, the circles are never perfect but that's okay because the tree branches are not perfectly round either. I aim to get the leg going into the hole fairly tightly and then if there are any gaps, like you see above, I use sawdust (saved as I'm drilling out the holes) mixed with wood glue to fill in the gaps. The drilled holes also usually determined which leg sits where as I try and get the most smug fit for all. If a leg isn't fitting, you need to drill the hole a bit wider or sand the leg to be slimmer - take everything I say with a grain of salt as well :P


A coat of white paint to the legs and a matte sealer over the whole thing and hey presto finished stool :)


If you have any tips on making stools yourself, let me know, I'm always open to new ideas or smarter ways to do things :)

Thursday, April 5, 2018

Year of booms - March


Another month down and so much to share on my year of blooms project!


The roses kept on blooming throughout the month of March and I was able to save their petals again


Probably the most exciting happening, Ben and I were able to save a huge orchid! I cannot express how happy it made me to carry this thing around before finding a home for it, nestled against a tree in our yard.

March - orchid

Ben bought home a lovely bunch of flowers which made our house smell super lovely. 

Word of warning, you do have to be careful with these lillies around cats as their pollen can be deadly.

At the start of the month I planted, poppies, pansies and peony.

I'm a little worried those seeds may never sprout because I had to do a garden reset. All my little sprouts I spied in Feb popping up turned out to be mostly weeds. I did have some cosmos and sunflowers sprout (exciting!) but the sunflowers never grew to full size and died just as quickly as they bloomed. I asked Ben's mum to give her expertise and she suggested more fertiliser, more soil (or aerating what was there) and adding some bark. I explained how I had already planted lots of seeds so she suggested I could aerate just with a hand shovel. So I spent a day making the soil beautiful again and I'm really hoping for some successful months in the future :)

The plotted plants did great, the geranium were in full blooms.

(One of the pretty cosmos that did sprout in my garden bed!)

The award for best blooms goes to the desert rose, hands down!


We had some bromeliads bloom in our yard


Do garlic chive flowers count?


Poor sad sunflower!

I've been a little quiet on the blog front recently and that's because we traveled down to Port Macquarie the other week. You may remember how I mentioned that Ben's brother lives down there and how his wife gifted me sunflower seeds. When we visited her at Christmas her sunflowers looked amazing, she had planted them in September and was looking forward to planting more for her son's birthday in March (the reason we traveled down again). Well on her second planting her sunflowers didn't perform as well and she put it down to the wrong season. I chatted with her and she suggested I wait until September to replant and see how I go again :)

March - stool
Another project occupying my time has been working on Spirit You :) The stool above is from that side project and I have a seperate instagram account too if you would like to follow along.


March - cosmos


I'm excited for what blooms April brings :)
Fingers crossed my garden bed lives on!