Showing posts with label wood work. Show all posts

Tuesday, May 9, 2017

bought/gift/made /09

Three awesome things to share today!

First up in the bought category an electric planer, which has made my woodworking game even more solid - heh! heh! :P :P


Continuing with the home beautification project - a garden hose holder (try saying that fast 5 times) Super simple but it beats a tangled mess of hose on the ground.


And to finish off, the cutest drawing from my cousin's little girl!

Can you spot Gremlin and Peachy?? :) :) So much love!!!
read more "bought/gift/made /09"

Thursday, April 6, 2017

Wooden Docking Station

So I've been going through our house and seeing what areas could look better - the home beautification project :) I noticed an ugly power board with cords everywhere in our bedroom and decided I could build a wooden docking station!

I also built a little stand for Ben's light too!

I roughly sketched out an idea with the knowledge our docking station would need to house my tablet, two phones and possibly some camera battery chargers. You can see above the pieces to make the box with the little triangles to let the cords come out freely!

Nailing together the box was a little tricky but my 90 degree clamps made the job much easier! 
I also used some wood glue to make all the joins sturdier on completion

Ta-daaaa! box complete!

I cut out my panels for the top of the box - the bigger panel at the back to support my iPad and the smaller ones for our phones :) It was only when I started to attach these pieces to the box I had a *face palm* moment realising I could of had the back of the box simply extend up higher thus not needing the biggest panel you see above. That last sentence may be utterly confusing but if you give something similar a go make sure you 100% think through the plans first - maybe even make a paper mock up version first. 

Despite that little boo-boo I'm still super happy with how it turned out and it has definitely made our bedroom much prettier :)
read more "Wooden Docking Station"

Thursday, March 23, 2017

Wooden Stools Update

I thought I'd give a little stool update and talk about a new technique which has meant it's now much quicker to make a stool - hurrah!

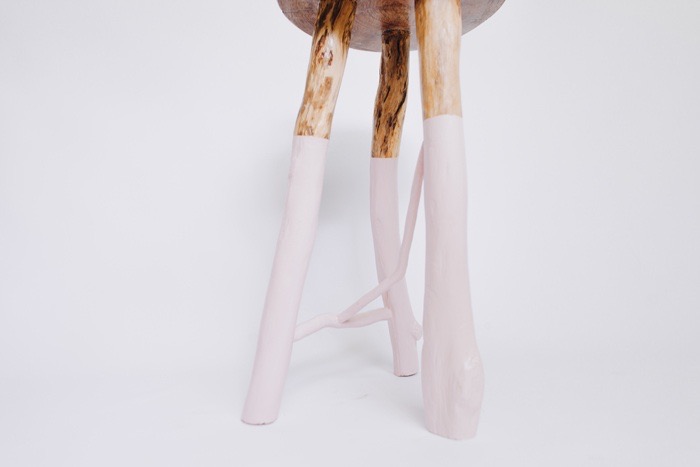
I'm super in love with my latest stool, maybe because it's dip-dyed pink but also awesome the combo of it being wonky AND structurally sound!

Making a stool usually takes me about a week and a big component of that was drilling the leg holes into the hardwood top, well until I finally set up our drill press!

Ben got given a bunch of tools from his bro, this drill press above being one of them. At the time, I had no idea what a drill press was but they consistently came up whilst googling wood working techniques. My only hurdle - the bolts were all rusted stuck! A few hours later of me being super stubborn and not letting rust win I managed to get everything unstuck, patted myself on the back and set the drill into place. I'm not 100% sure I have it rigged up correctly but even with the current set up it was at least five times faster then hand holding the drill :)

Even though it kind of looks like a face, the main reason I took the above photo was to show the difference in the drilled out holes. The hole on the left was with the drill press and the hole on the right was me hand holding the drill. With hardwood, you can't continually drill, because you'll burn out your drill bit which meant every time I re-started drilling (with the hand hold method) I inadvertently changed angles slightly which meant the finished hole was super messy! The drill press on the other hand, makes sure the angle is always the same.

I've got a bunch of timber I've collected to make a bunch more stuff, which I'm all super excited about! On a side note, our house now has a lot of stools, an item I never knew we needed before I started making them :p
read more "Wooden Stools Update"

Wednesday, March 8, 2017

Building A Desk - THE LEGS - Part 2

If you missed it, Part 1 covered the table top of the desk and today we're covering the legs!  As I mentioned before, I wanted the desk to be easily dismantled for when I next move, so these legs are pretty basic and simply slot into the top :) The sturdy factor of the overall desk is about 7/10 but if don't need the ability to dismantle you could easily secure the legs to the table top for 10/10 sturdiness

Leg Inspiration - here and here

THE LEGS - PART 2 (3 days to complete)

What you'll need

Everything from Part 1 + Some brackets!


4 x sturdy brackets (I ended up using 4 more which I'll explain in a second)

STEPS 

Step /1 Measurements
Work out the height of your table. I used this site to work out the right dimensions for my height.  I then encountered that it wasn't possible to have the desk, quite the right height due to my chair height + wanting to avoid my knees hitting the desk so I gave myself a bit more height so my legs could fit under comfortably

Step /2 Measure Twice Cut Once
With your measurements above, cut your pieces down to size, you're going to be making 2 square frames and you need to know their height (gathered in step 1) and their width which will be dependent upon your table top's width (gathered in Part 1).  I actually cut my height pieces a little longer and as you'll see in part 5 this was a very lucky thing! But if you're not like me just take your time measuring and cutting correctly :P

Step  /3 Sand
When using reclaimed wood, the upside is that you may be able to get your pieces very cheap or free but if you want a professional looking finish you'll have to put in the time to sand your pieces down. A rustic look may be you thing though so potentially discard everything I just said :P

Step /4 Clamp and Screw the Frames
Using your 90 degree clamps build your frame minus the bottom board. Put some wood glue between the join, pre-drill a hole and then use a screw (remember, drill a hole a fraction bigger than the screw but the same length).

Step /5 Test and Correct
Temporarily put your frames (minus their bottom piece) into the underside of your table top to double check your measurements.  It was here I had realised one of my frames was going to be a fraction shorter than the other (luckily I had allocated extra length during step 2). For an even desk you definitely need both leg frames the exact same height so at this stage do your final cuts to make sure they both match.

Step /6 Finish the Square
Pre-drill and screw the final piece of wood to the leg frames to complete the square shape.

Step /8 Add Brackets
I added 2 brackets to each frame.  I initially thought I'd only need 2 for each frame and these would sit at the top, hidden by the table top but to make things sturdy I did need to make some adjustments in step 7 below!

Step /7 Test the Sturdiness
Once the two frames were finished I tested them again underneath the table top. I found the frames had a slight wobble so I went out and bought some longer screws (changing the 50mm lengths to 75mm) and re-screwed (plus re-glued) the four joins - I also added an extra set of brackets at the bottom corners of both frames. Learn from my mistakes here and it probably won't take you 3 days to complete :P

Step /8 Sand
Fill any holes (with either wood filler or wood glue + sawdust) and sand your leg frames (I ended up filling and sanding my legs around 4 times to make sure the end result would be beautiful! After this process make sure you give all your pieces a good wipe down ready for the painting stage!

In Part 3 I'm going to discuss all the final steps before your desk is ready to use!
read more "Building A Desk - THE LEGS - Part 2"

Friday, December 16, 2016

DIY wooden stool with Lettering

So I've sat with this particular stool for a while, before going kind of crazy with its paint job and calling it a day :) 


I tried to be diligent with taking photos of the process and it's nice to look back now and see the wood that I started with. I will point out this particular stool had legs from a previous cement stool (no longer with us!). I decided I'm only making stools of the sturdy variety so the concrete configurations had to go :p

The chunk of wood I found I was able to be cut in half for two stools!

The outer bark has to go! This part is really fun especially getting to use the chisels - also you can see here just how deep the piece of wood is :)

I ended up filling, the crack on top with sawdust (that I save whilst sawing) mixed with wood glue. I also make sure to spend a lot of time sanding back the wood so it's nice and smooth for the finished piece.

The sawing took me about a week and almost killed my love for wood working :p

The slice of wood was also very weathered so it needed both ends sawed off which added an extra week or so and yes, made me really really hate sawing :p I think it was worth it though, look how pretty the wood is underneath.

The guy on the right - so pretty!

Then it was time to mark the leg position and drill them out. Looking back at the finished piece, I think for the next stool I'll make the legs closer to the edges for aesthetic purposes :)

Note to self: always learning!

For the paint job: the legs are a black stain, the pink I picked up at a flea market and then some random hand lettering type design for the top with a clear sealer all over :)

Ta-daaa!

Ben started using the stool almost immediately as it's the perfect height for his craft bench outside, so I'm pretty chuffed about that
read more "DIY wooden stool with Lettering"

Friday, January 15, 2016

DIY Wooden Stool

Since my $5 bucket stool challenge and failed cat bed, I've had the desire to get my carpentry back on. I call myself the dodgey woodworker because I rarely check to see what I'm doing is the correct method and thus end up, with some less than questionable products. The fun aspect for me is the problem solving and the making and in the process I become absent minded of perfection. I did finally Google how to make a stool and I even went down to our local hardware store and bought myself a drill bit. I have no idea if it's the right one or not but I must say, this latest stool is my most sound yet :p


 I also went with this harlequin circus theme with the paint job, I kept second guessing my self on the colour choices and design but it's really grown on me :)

You can see how it looked before, I used a circular piece of wood I found at our old place and then some fallen tree branches from one of our walks :) I did try and be professional and measure and tape up the diamond design but since the wood surface was very uneven the paint job was very uneven I ended up finishing it off free hand. Oh and I sanded everything and filled holes before I started just to try and be a tad more professional!

I love the top, I used a stain + varnish (Black Japan gloss by Feast Watson) which I put three coats on and it's super shiny and lovely :) The rest of the stool was painted in house paint which I've collected sample pots of whilst thrifting or in the clearance bin at the paint store :) Even though I did it on the super cheap I'm sure you could go to the store and buy something cheaper and much sturdier but I love that I made it myself. I'm currently working on upgrading one of my old cement stools and this time I think I may have finally perfected my wood stool method and you might even be able to sit on it :P
read more "DIY Wooden Stool"